How to Install an Indoor Sauna: Step-by-Step
You’ve got two routes: a pre-built kit (panels that bolt together — fastest) or a custom framed room (most flexible). Either way the sequence and the requirements are the same. This is an overview; pair it with our room requirements and heater sizing guides for the specifics.
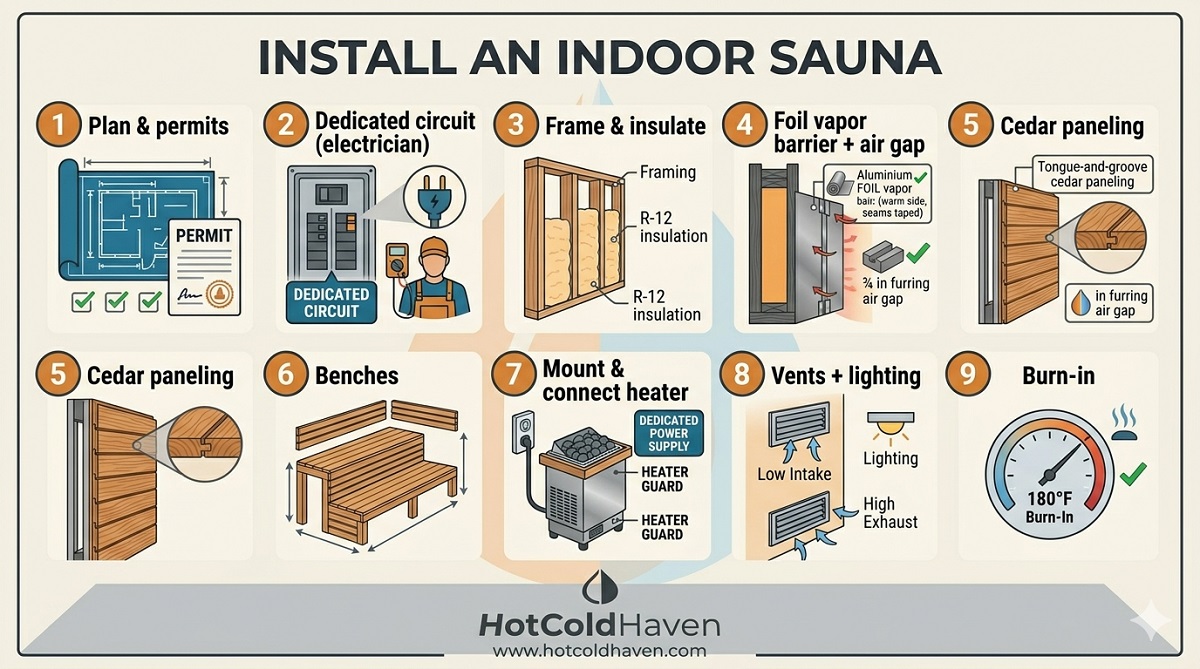
1. Plan & check permits
Confirm your location (basement, spare room, garage), measure the space, and check local permit requirements — electrical work in particular often needs a permit and inspection. Decide kit vs custom now, since it affects framing.
2. Electrical rough-in
The heater determines the circuit: 3 kW+ needs a hardwired 240V dedicated circuit; small infrared runs on a dedicated 120V. Have a licensed electrician run and connect it, with breaker and wire sized to the heater and GFCI where required. Never share the circuit or use an extension cord.
3. Frame & insulate
For a custom room, frame the walls and ceiling and fill with at least R-12 insulation (more in the ceiling). Keep the ceiling to 6.5–7 ft.
4. Vapor barrier
Staple aluminium foil vapor barrier to the warm side of walls and ceiling, overlap seams 2–3″ and seal with foil tape, and seal every penetration. Add furring strips for a ¾” air gap behind the paneling.
5. Paneling, benches & door
Install tongue-and-groove cedar (or spruce/aspen), build benches from clear-grade lumber with no exposed metal on sitting surfaces, and hang a tempered-glass or solid-wood door at least 24″ wide.
6. Heater, controls & ventilation
Mount the heater per the maker’s clearances, have the electrician make the final connection, and fit the control panel. Add a low intake vent near the heater and a high exhaust on the opposite wall, plus a vapor-proof, heat-rated light.
7. First burn-in
Run the new heater empty (no bathers) per the manufacturer’s instructions to cure off any manufacturing residue before your first session.
FAQ
Can I install a sauna myself?
Much of it, yes — framing, insulation, the foil vapor barrier and paneling are DIY-friendly, and pre-built kits assemble with hand tools. But the final electrical connection for the heater should be made by a licensed electrician, and you should confirm permit requirements first.
Do I need a permit to install a sauna?
Often yes for the electrical work, and sometimes for the structure — it varies by jurisdiction. Check with your local building authority before you start, especially for a hardwired 240V heater.
How long does it take to install a sauna?
A pre-built indoor kit can go together in a day or two plus the electrician’s visit. A custom framed room is more involved — typically several days to a couple of weekends including insulation, vapor barrier and paneling.
What’s the hardest part of installing a sauna?
The electrical and the vapor barrier. Getting a correctly sized dedicated circuit installed safely, and sealing a continuous foil vapor barrier, are what most affects safety, efficiency and longevity.
Sources
- Haven of Heat — Sauna electrical & install requirements. havenofheat.com
- Peak Primal Wellness — DIY sauna plans (framing, vapor barrier, ventilation). peakprimalwellness.com
- Finnish Sauna Builders — Essential requirements & safety. finnishsaunabuilders.com
Educational only. Codes and conditions vary — confirm locally and consult a licensed professional.