DIY Cold Plunge: 3 Ways to Build Your Own
A DIY cold plunge can match a finished tub’s performance for a lot less — you’re trading money for effort. Here are the approaches, the parts you need, and the safety points that matter. First, understand the hardware in our chiller guide.
Route 1 — Tub + ice (the simplest start)
An insulated tub, stock tank, or even a sturdy bin, filled with cold water and ice. Cheapest to set up and great for testing whether you’ll stick with cold therapy — but at two $4 bags a session, daily use runs over $200/month in ice. Best for occasional plunging.
Route 2 — Chest-freezer conversion (cheapest to run)
A chest freezer holds cold extremely efficiently (roughly $45–$65/year to maintain). The trade-offs are real, though: freezers aren’t built to hold water, so you must address waterproofing/lining, drainage and sanitation, and any electrical modification near water needs proper GFCI protection. Approach with care — or skip to Route 3.
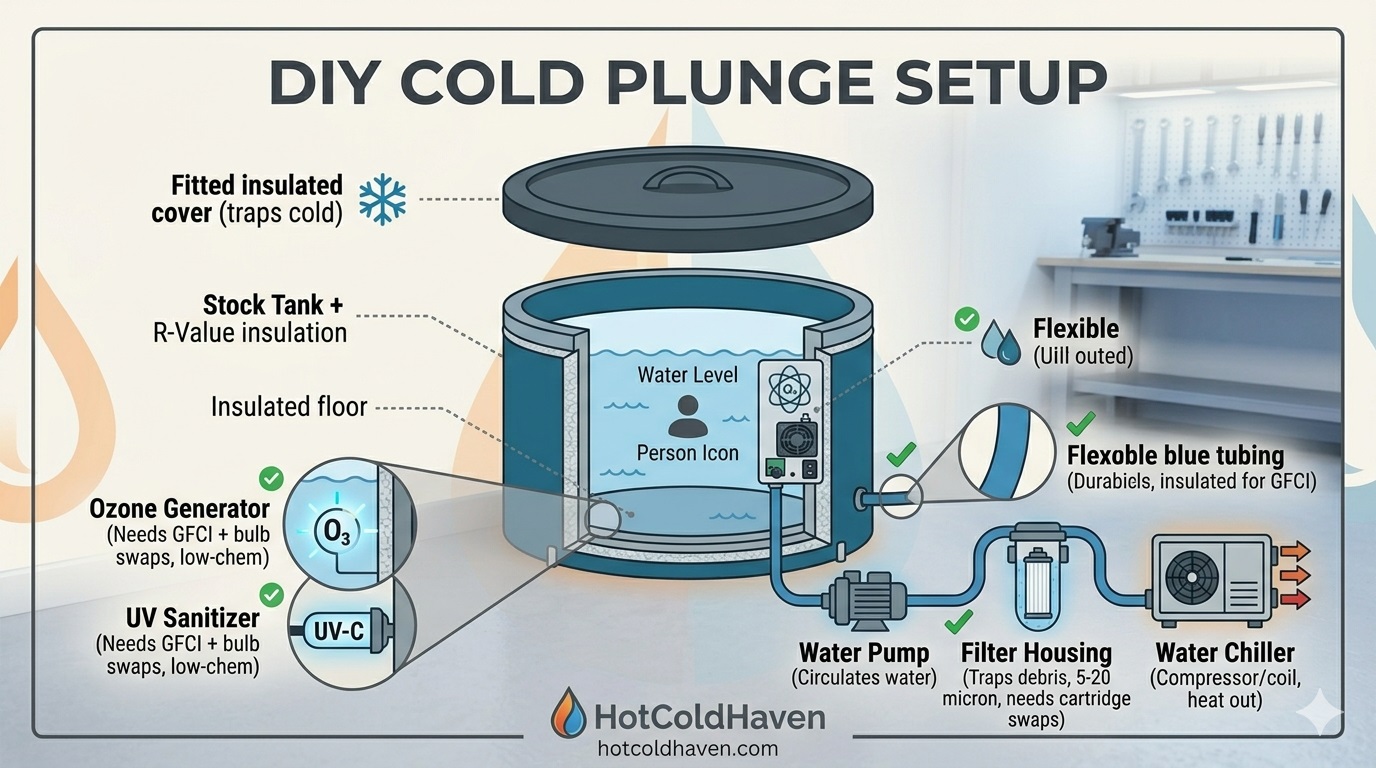
Route 3 — Tub + chiller (most convenient)
The setup that behaves like a finished plunge. You’ll assemble:
- An insulated tub or stock tank.
- A water chiller sized to your tub and climate (HP controls speed, not minimum temperature — see the chiller guide).
- A circulation pump (~950–1,800 GPH) and a filter (20–50 micron).
- Tubing & fittings, and ideally ozone/UV for sanitation.
- A fitted insulated cover — the biggest lever on running cost.
Safety essentials
FAQ
What’s the cheapest way to build a DIY cold plunge?
A stock tank or insulated tub plus ice is the cheapest entry, but ice gets expensive fast. A converted chest freezer is the cheapest to run long-term, while a tub plus a dedicated chiller is the most convenient DIY route.
Do I need a chiller for a DIY cold plunge?
Only if you want consistently cold water without buying ice. A chiller (with a pump and filter) holds temperature automatically. Without one you rely on ice, which suits occasional use.
Is a chest freezer cold plunge safe?
It can be, but it demands care: a freezer isn’t built to hold water, so it needs proper waterproofing/lining, and any electrical work near water must be GFCI-protected. Many people prefer a purpose-built tub and external chiller for peace of mind.
How much does a DIY cold plunge cost?
Anywhere from under $150 for a basic tub-and-ice setup to roughly $1,000–$2,500 once you add a quality chiller, pump and filter — still well below many finished tubs, with more hands-on effort.
Sources
- DIY Cold Plunge — Choosing a chiller & assembling a build. diycoldplunge.com
- Peak Primal Wellness — Home wellness spa running costs (chest-freezer figures). peakprimalwellness.com
- Bennett Carby — Best water chillers for cold plunging (pumps, sizing). bennettcarby.com
Educational only. Codes and conditions vary — confirm locally and consult a licensed professional.